Tuesday 25 June 2013

50 project count down

50 Project Count down

#1-#7 : Heart Shaped Potholders

My mom just finished up 7 sets of potholders for our friend Emma's mom who wanted something Canadian to bring with her to Scotland for gifts.  (You should check out Emma's blog: Peachy Keen Stitches )


 #8-#10: Minky Animal Blankets 

Mom also finished up a brown bear, pink elephant and yellow bear that some friends of ours ordered.  (I included pictures of all of them though because they are so cute)


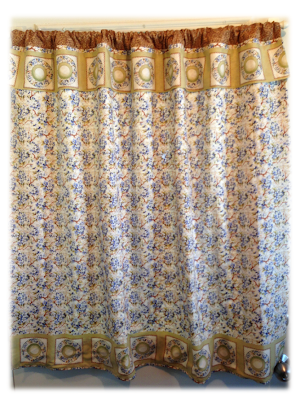
#11: Curtains

My finished curtains from the last blog post.


That's all for now but at least it's progress!

11 down, 39 to go...

~KT

Double-Sided Curtain Tutorial

On Sunday it was "house work day" at our place.  Cole was going outside to weed-whack and do some yard work and all I really wanted to do was sew.

So I finally made curtains for our front door.  (My mom bought me a magnetic curtain rod ages ago but I'd never bothered to actually make curtains for it.)  


(1) Cole picked the fabric from a selection that I pulled out of my stash. It was something I got for $4/m when I worked at Northern Vacuum and Sewing and I was happy to give it up for curtains since I didn't have a project in mind for it and it was so darn cheap!

We wanted the curtains to be double sided so that people coming to the door also got to see pretty curtains and I was lucky that I had enough, just under 4 times the width of the window.

(2) First, I cut the border off from one end and decided it would be cute to have a ruffle border at the top as well as the bottom.  I made a teeny double fold hem on the bottom edge and stitched it down.

(3) The curtain was going to be just a little to short with the width of fabric (minus one border) so I decided to add some coordinating fabric from my stash.  I pretty much just made a big tube of coordinating fabric the width of my curtain.

I chose to stitch the ends down and leave a gap to turn it right side out and then folded this in half for the top of the curtain.  It wasted a lot of fabric to have the inside of the pocket be finished but I hate when curtain rods catch on seams.

(4) Picture of the "tube" right side out
(5) then I laid my curtain fabric right sides together and I just cut the whole length into two pieces.  Each piece worked out to just under twice the width of the curtain so I figured it would be a good amount of ruffle.

(6) I found the middle and laid one curtain piece facing up and one border also facing up.  How they would be when finished.

(7) Then I laid my "tube", folded in half, with the open end up.

(8) After that I laid the second border face down, with the second curtain piece facing down on top of it.  Essentially making a big sandwich of the layers.

(9) Lastly I made sure that the "tube" and borders were folded in from the corner so I wouldn't catch then when sewing and I pinned the whole way along.

I'm sure there are faster and more efficient ways of doing this but I didn't want to have to hem edges after and it was my first time making double sided curtains, or any curtains at all for that matter.

(10) then I sewed all the way around, leaving a hole at the bottom for turning.  I checked my top corners to make sure I hadn't caught the edges of the border (luckily I didn't, YAY!), and then I zig-zagged around to finish the seam.

Then I turned the whole thing right side out, pressed it and top stitched along the bottom edge to close the hole.

(11) The I hung them up and admired my handy work.  It even looks pretty from outside the door (12).

Sadly this project took longer than Cole's yard work but he's very happy with them and now thinks my summer project should be curtains for every room.

I personally think they would have been better and so much easier if he had let my do hanging tabs with cute little buttons but he was adamantly against it.

The best part was I got to spend the day sewing and listening to audiobooks and I got to call it housework.


1 project down, 49 to go
~KT


Sunday 23 June 2013

We made a wish and you came true...


I'm pretty proud of how this Nancy Halvorsen wall hanging is coming along.  I was at my friend Sylvie's house on Saturday working on UFOs and I managed to finish the hand stitching and put on the buttons.  

Now I just need to do tabs and binding and I'm done.  I know it needs a name and stuff but I like this project enough that I think I'm going to keep it for someday when we have kids.


Don't worry I didn't spend very long working on this I had real UFOs to do.  This time it was the magic tile I've been working on for a while.  Pictures to follow next time, or if I ever finish it.  

The good news is mom has been working on a bunch of custom orders we had from the craft fair so at least their are projects getting finished and I am getting closer towards getting new fabric.

I will try and take some pictures so I can keep a nice visual list as we complete our 50 projects!

~KT


Tuesday 4 June 2013

Applique Project

Winsome Baby was one of the first Nancy Halvorsen books I ever bought.  Though I have bought a number of her books since I have never actually sewn anything from one of them and I thought maybe it was time to start.

I've been home sick for a few days and I'm finally feeling well enough to sit up so I wanted to spend part of the day sewing.  My sewing room was a disaster so I literally pushed everything off to the side and picked up the book.

Some fusible web and a stack of pretty pastel fabrics and I was ready to roll.  Well that, and a good audiobook. (Right now I'm listening to Clash of Kings by George R. R. Martin.)

I picked the announcement wall hanging pictured on the front of the book because it is just so sweet; "we made a wish and you came true"
I started by picking fabrics and laying out the base for the front. (The inside border is very tiny, 3/4" cut and only 1/4" once sewn.)  Then I sandwiched the layers together with a little bit of basting spray and started the hard part.

The pattern is meant to have the baby's detailed stitched on before it is put together but I don't know who I'm making it for yet so I will just do that later.  

Then I traced and cut out tons of tiny little pieces and started appliqueing them on.  

I used a blanket stitch in matching thread to go around every piece, starting with the bottom shapes like the branch and working my way up.  The little flowers and hearts took ages because I'm so darn picky!

Now all that's left is to hand embroider the saying and finish it off.  That and decide who it's for...


This is one of my first applique projects and overall I'm quite happy with it so far.  Nancy Halvorsen's books are just SEW beautiful and I'm happy that I'm finally trying one of the projects.  

I suspect you will be seeing more of then as I work to complete my 50 projects.  

happy sewing!
~KT